Monday, February 16, 2015

How to use Visual Basic Editor in Excel VBA ?

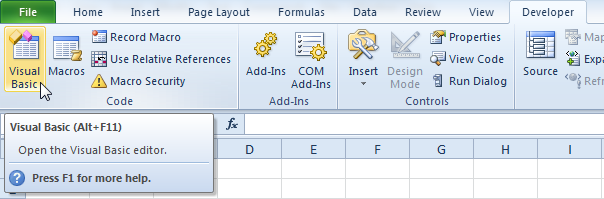
The Visual Basic Editor is the starting point for creating macros in Excel VBA, so it is important to get this configuration right. To launch the Visual Basic Editor in Excel 2010 or Excel 2007, click on Visual Basic (or press Alt+F11).


Below Visual Basic Editor window will open
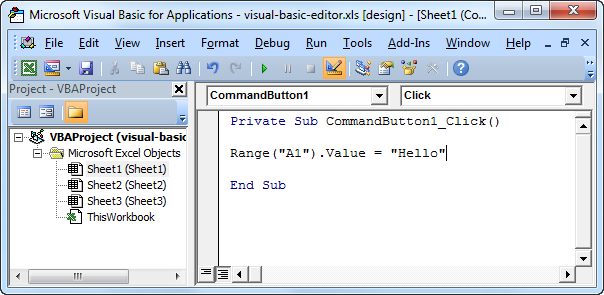


The left window with the sheet names in it is called the Project Explorer. If you can't see the Project Explorer, click on View and then Project Explorer. Most probably the Project Explorer will already appear as a column on the left side of the screen. If not, follow the below steps to achieve this:

1. Right click on the Project Explorer
2. Check Dockable (If required)
3. Click on Project - VBAProject and drag the Project Explorer to the left side of the screen

The Code window can be added by clicking on one of the sheet names. To cover the whole screen, you can maximize the Code Window. We feel that this is the best configuration of the Visual Basic Editor.

On the left side of the window under project explorer, you will find 3 folders:
1. Microsoft Excel Objects:
All Excel Sheets and workbooks will be available under this folder
2. Forms:
Any user forms created in the excl VBA will be available under this folder
3. Module:
All created macros will be available under this modules folder

You can add the object or reference libraries with the help of adding VBA references.
1. Go to Tools
2. Click on References
3. Tick the library or references you need to add to execute your macros

4. Click OK, done


Sunday, February 15, 2015

Macro Security in Excel VBA

You need to set up the macro security settings correctly to protect yourself against potential viruses. Make sure your macro security settings are set up correctly so that they may not create any harm to your computer.

To set up the macro security settings in Excel 2010 or Excel 2007, execute the following steps.


1. Click on Macro Security.


2. Here you have four options. The first option will disable all macros. The second option will always ask you to enable a macro. The third option will only allow macros with a digital signature to run, and ask you to enable others. The fourth option will enable all macros.


As per me we should use the second security level if we are downloading a lot of Excel files from the internet. With this security level we can always disable the macro if we don't trust the owner of the Excel file.

We can use the fourth security level only if we are only typing our own macros and checking them. With this security level we don't have to always enable macros.


How to edit and debug the macro created in Excel VBA ?

There are two ways to view the already recorded macro.

1. You can click on Macros from the Developer tab and then click on Edit. The Visual Basic Editor will appear.
2. You can directly open the Visual Basic Editor by clicking on Visual Basic from the Developer tab (or press Alt+F11).


The created macros are placed into a module called Module1. You can also place the code on the any of the Sheets, in this case the macro will be available for particular sheet only. While the macro created in the module is available for all the sheets in the workbook.

To manually run the code step by step, press F8

To run the code till particular step, you need to break the code for this, put your cursor on the line where you need to put break and press F9


Once you press F9, the line color will be changed to brown selection. When executed the macro will stop at this line.


How to use Excel Macro Recorder ?

The Excel Macro Recorder is a very useful tool included in Excel VBA. With the Excel Macro Recorder you can record a task you perform with Excel. Next, you can execute the task over and over with the click of a button which can save you a lot of time.

The Macro Recorder, a very useful tool included in Excel VBA, records every task you perform with Excel. This is good news if you want to automate repetitive tasks. All you have to do is record a specific task once. Next, you can execute the task over and over with the click of a button. This can save you a lot of time! The Macro Recorder is also a great help when you don't know how to program a specific task in Excel VBA. Simply open the Visual Basic Editor after recording the task to see how it can be programmed.

There are a lot of things you cannot do with the Excel Macro Recorder. For example, we cannot loop through a range of data with the Macro Recorder. Also, the Macro Recorder uses a lot more code than actually required, which can slow your execution process.

To record, run and edit a recorded macro, follow the below steps:
1. Click on the Developer tab


2. Click on Record Macro. See the picture below. Each of the commands you perform will be saved into the macro.


3. Here you can give your macro a name and you can enter a shortcut for your macro (both optional). You can store your macro in three workbooks. If you choose to store your macro in Personal Macro Workbook, the macro will be available to all your workbooks (Excel Files). This is because Excel stores your macro in a hidden workbook that opens automatically when Excel starts. If you choose to store your macro in New Workbook, the macro will only be available in an automatically new opened workbook. If you choose to store your macro in This Workbook, the macro will only be available in the current workbook.


We will now record a macro that changes the format of Cells to Number with zero decimals.

4. Click on OK.
5. Right mouse click on the active cell (selected cell). Be sure not to select any other cell! Then click on Format Cells...


6. Choose Number and click on OK.


Below is the before and after formatting result:


How to create a command button and assign macro to it in Excel VBA ?

You can now click on the Developer tab which is now visible next to the View tab.
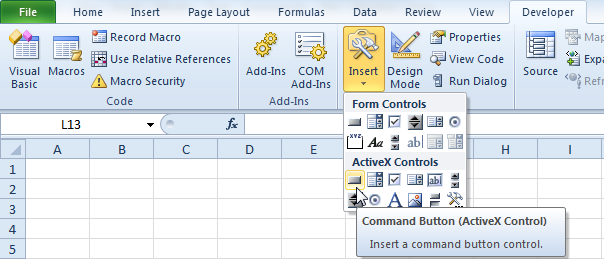
1. Click on Insert
2. Click on Command Button in the ActiveX Controls section


Create and assign the macro to our created button
We will write few lines of code and assign them to the command button.

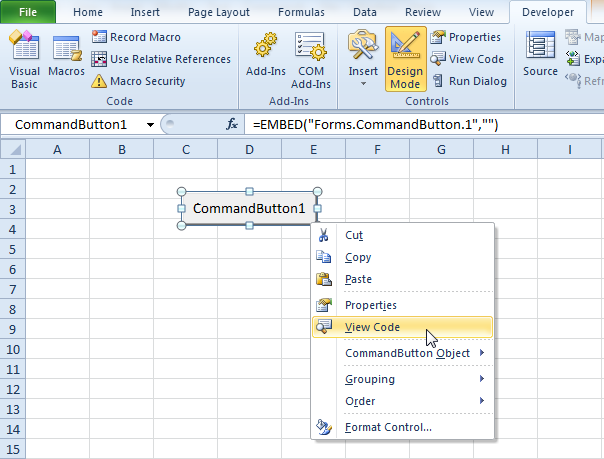
1. Right click on the CommandButton1
2. Click on View Code


3. The Visual Basic Editor will be opened. Place you cursor between 'Private Sub CommandButton1_Click()' and 'End Sub'.
4. For example, add the following code line:

Range("A1").Value = "My First Code !"


We have completed creating the simple macro and assigning it to command button.

How to turn on the Developer Tab in Excel ?

1. Click on the File tab and choose Options. This will open the Excel Options dialog box
2. Click Customize Ribbon on the left side of the dialog box
3. Under Choose commands from on the left side of the dialog box, select Popular Commands
4. Under Customize the ribbon on the right side of the dialog box, select Main tabs
5. Check the Developer check box and click OK


6. Done, you will be able to see the below developer tab activate in Excel Menu


Monday, January 12, 2015

How to Create a Macro in Excel VBA ?

To start with creating the Excel VBA macro, we will be creating a simple display message macro.

Create Macro

Using Excel VBA we can automate tasks in Excel by writing macros. A set of VBA code instructions to automate the repeated tasks or complex, time consuming tasks.

1. Press Alt + F11 to view the Visual Basic Editor

2. Select VBAProject("your excel file name")
3. Right click on on the name
4. Click Insert -- Module

Module - the codes written will be saved in the modules. you can create multiple modules, under same file to manage your codes.


On the blank editor window write below code:


Sub DisplayMessage()


MsgBox "My First VBA Macro!"


End Sub


In above code the DisplayMessage is our macro name. After executing this macro, it will give us a pop-up message with "My First VBA Macro!".


How to run this macro from Excel :

1. You can assign the code to the command button or any excel object.
2. Insert text box in excel, rename it as Display Message.
3. Right click on text box and click Assign Macro
4. Select this workbook and you will be able to see the macro name created by us
5. Select the macro name

Now if you hover the mouse over the text box, the mouse arrow will change to hand icon which means the text box is now clickable.


Now you can click on the text box and the macro will be executed. You will receive a pop-up message saying, "My First VBA Macro!"


Message box in excel VBA

The MsgBox dialog box in Excel VBA can be used in many ways to provide the required information to the users. Wherever they need to know and take actions based on that.

1. Write a simple message in Excel VBA, MsgBox "First message box code". When executed, it will display the below messagebox:


2. Combining the message box to display the value in the specific cell. If you want to display the updated or changed value in cell B4, we can use the code, MsgBox "The value in cell B4 is " & Range("B4").Value


Here in this code, we have used the & operator to concatenate the text and the value is cell B4.

3. Writing the message on the multiple lines we just need to concatenate the text with vbNewLine. for e.g., 
MsgBox "This is my first Line" & vbNewLine & "This is my second Line"


Use of Workbook and Worksheet Object

In Excel VBA we use the worksheet object to give references while working with the code. In Excel VBA there can be a object hierarchy i.e., an object can contain another object and that object can contain another object and so on.

The hierarchy starts with Excel itself, say excel is at the top of the hierarchy as an application object. The application object contains other objects. e.g., the workbook object excel file. This excel file can be any file which is open or created by us.

Now further the Excel workbook object, contains other objects, such as worksheet. Further the worksheet object contains Range objects.

The flow is like below:
Application object --> Workbook object --> Worksheet object --> Range object

When we write Range("B4").Value in the VBA code, it actuually refers as:
Application.Workbooks("your file name").Worksheet(1).Range("B4").Value

the objects as connected by dots.

Don't worry about the object hierarchy much, as you don'y need to write the code this way. This is just for your knowledge, that how the object hierarchy is connected and works.


Use of properties and methods

The collection of workbooks or worksheets have Properties, while methods are something which perform some actions with help of properties. We can see few examples below to understand this.

1. We can use the count property of the worksheets collection to count the number of worksheets in a workbook.

Sub WorksheetCount ()
MsgBox worksheets.count
End Sub


This code when executed, will give us the number of worksheets present in the workbook.


2. Similarly we can use the Add method of the workbooks collection to create a new workbook.

Sub AddWorkbook
Workbooks.Add
End Sub

This code will add the new workbook, in existing open application.