Tuesday, February 17, 2015

Must know VBA functions in Excel VBA

1. CCur - Converts an expression to currency data type

2. CDate - Converts an expression to date data type

3. CDbl - Converts an expression to double data type

4. CDec - Converts an expression to decimal data type

5. Choose - Selects and returns a value from a list of arguments

6. Chr - Converts an ANSI value to a character

7. CInt - Converts an expression to integer data type

8. CLng - Converts an expression to long data type

9. Cos - Returns the cosine of a number

10. CVErr - Returns a user-defined error type

11. Date - Returns the current system date

12. DateAdd - Returns a date with a specific date interval added to it

13. DateDiff - Returns the difference between two dates as a time interval

14. DatePart - Returns an integer containing a specific part of a date

15. DateSerial - Returns a date for a specified year, month, and day

16. DateValue - Converts a string to date

17. Day - Returns the day of the month of a date

18. Dir - Returns the name of a file or directory that matches a pattern

19. DoEvents - Yields execution so the operating system can process other events

20. EOF - Returns True if the end of a text file has been reached

21. Error - Returns the error message that corresponds to an error number

22. Exp - Returns the base of the natural logarithms (e) raised to a power

23. InputBox - Displays a box to prompt a user for input, and returns the value entered

24. InStr - Returns the position of a string within another string

25. InStrRev - Returns the position of a string within another string, beginning at the back end of 
the string

26. Int - Returns the integer portion of a number

27. IsArray - Returns True if a variable is an array

28. IsDate - Returns True if a variable is a date

29. IsEmpty - Returns True if a variable has not been initialized

30. IsError - Returns True if an expression is an error value

31. IsMissing - Returns True if an optional argument was not passed to a Procedure

32. IsNull - Returns True if an expression contains no valid data

33. IsNumeric - Returns True if an expression can be evaluated as a number

34. IsObject - Returns True if an expression references an OLE Automation object

35. Join - Returns a string created by joining a number of substrings contained in an array

36. MonthName - Returns a string indicating the specified month

37. MsgBox - Displays a modal message box and returns the ID of the button clicked

38. Now - Returns the current system date and time

39. Oct - Converts from decimal to octal

40. Replace - Returns a string in which one substring is replaced with another

41. RGB - Returns a number representing an RGB color value

42. Right - Returns a specified number of characters from the right of a string

43. Rnd - Returns a random number between 0 and 1

44. Round - Rounds a number to a specific number of decimal places

45. RTrim - Returns a copy of a string with no trailing spaces

46. Second - Returns the second of a time

47. Seek - Returns the current position in a text file

48. Sgn - Returns an integer that indicates the sign of a number

49. Shell - Runs an executable program

50. Sin - Returns the sine of a number

51. Tab - Positions output in an output stream

52. Tan - Returns the tangent of a number

53. Time - Returns the current system time

54. Timer  - Returns the number of seconds since midnight

55. TimeSerial  - Returns the time for a specified hour, minute, and second

56. TimeValue  - Converts a string to a time serial number

57. Trim - Returns a string without leading and spaces and replaces multiple spaces with a single space

58. TypeName  - Returns a string that describes the data type of a variable

59. UBound - Returns the upper bound of an array

60. UCase - Converts a string to uppercase

61. Val - Returns the numbers contained in a string

62. VarType - Returns a value indicating the subtype of a variable

63. Weekday - Returns a number representing a day of the week

64. Abs - Returns the absolute value of a number

65. Array - Returns a variant that contains an array

66. Asc - Converts the first character of string to its ASCII value

67. Atn - Returns the arctangent of a number

68. CBool - Converts an expression to Boolean data type

69. CByte - Converts an expression to byte data type

70. CreateObject - Creates an OLE Automation object

71. CSng - Converts an expression to single data type

72. CStr - Converts an expression to string data type

73. CurDir - Returns the current path

74. CVar - Converts an expression to variant data type

75. CVDate - Converts an expression to date data type

76. FileAttr - Returns the file mode for a text file

77. FileDateTime - Returns the date and time when a file was last modified

78. FileLen - Returns the number of bytes in a file

79. Fix - Returns the integer portion of a number

80. Format - Returns an expression in a particular format

81. FormatCurrency - Returns a number as a string, formatted as currency

82. FormatDateTime - Returns a number as a string, formatted as a date and/or time

83. FormatNumber - Returns a number as a formatted string

84. FormatPercent - Returns a number as a string, formatted as a percentage

85. FreeFile - Returns the next file number available for use by the Open statement

86. GetAll - Returns a list of key settings and their values (originally created with SaveSetting) from an application’s entry in the Windows registry

87. GetAttr - Returns a code representing a file attribute

88. GetObject - Retrieves an OLE Automation object from a file

89. GetSetting  - Returns a key setting value from an application’s entry in the Windows registry

90. LBound - Returns the lower bound of an array

91. LCase - Returns a string converted to lowercase

92. Left - Returns a specified number of characters from the left of a string

93. Len - Returns the length of a string, in characters

94. Loc - Returns the current read or write position of a text file

95. LOF - Returns the number of bytes in an open text file

96. Log - Returns the natural logarithm of a number

97. LTrim - Returns a copy of a string with no leading spaces

98. Mid - Returns a specified number of characters from a string

99. Space  - Returns a string with a specified number of spaces

100. Split  - Returns an array consisting of a number of substrings

101. Sqr - Returns the square root of a number

102. Str - Returns a string representation of a number

103. StrComp - Returns a value indicating the result of a string comparison

104. StrConv - Returns a string variant converted as specified

105. String - Returns a repeating character or string

106. StrReverse - Returns the characters of a string in reverse order

107. Switch - Evaluates a list of expressions and returns a value associated with the first expression in the list that is True

108. Weekday Name - Returns a string indicating the specified weekday

109. Year  - Returns the year of a date

110. MidB - Returns a specified number of bytes from a specified position in a string string

111. Minute - Returns the minute of a time

112. Month - Returns the month of a date

113. Hex - Converts from decimal to hexadecimal

114. Hour - Returns the hour of a time

115. IIf - Returns one of two parts, depending on the evaluation of an expression

116. Input - Returns a specific number of characters from an open text file

Must know VBA Statements for Excel VBA Programming

Below is the list of VBA statement and the details about what action it executes.

1. Option Explicit - Forces declaration of all variables in a module

2. Option Private - Indicates that an entire module is Private

3. Private                 - Declares a local array or variable

4. Public                  - Declares a public array or variable

5. Dim                 - Declares variables and (optionally) their data types

6. AppActivate - Activates an application window

7. Beep                 - Sounds a tone via the computer's speaker

8. Close                 - Closes a text file

9. Const                 - Declares a constant value

10. Call                 - Calls another macro, write name of the other macro in front of Call

11. ChDir         - Changes the current directory

12. MkDir         - Creates a new directory

13. ChDrive         - Changes the current drive

14. Date                 - Sets the current system date

15. Declare         - Declares a reference to an external procedure in a Dynamic Link Library (DLL)

16. DeleteSetting - Deletes a section or key setting from an application's entry in the Windows Registry

17. Do-Loop          - Loops through a set of instructions

18. Exit Do          - Exits a block of Do-Loop code

19. For-Next          - Loops through a set of instructions a specific number of times

20. For Each-Next    - Loops through a set of instructions for each member of a collection

21. Exit For          - Exits a block of For-Next code

22. Function           - Declares the name and arguments for a Function procedure

23. Exit Function   - Exits a Function procedure

24. Property Get   - Declares the name and arguments of a Property Get procedure

25. Property Let   - Declares the name and arguments of a Property Let procedure

26. Property Set         - Declares the name and arguments of a Property Set procedure

27. Exit Property        - Exits a property procedure

28. Exit Sub               - Exits a subroutine procedure

29. End                    - Used by itself, exits the program; also used to end a block of statements that begin with If, With, Sub, Function, Property, Type, or Select

30. Name                   - Renames a file or directory

31. On Error            - Gives specific instructions for what to do in the case of an error

32. On...GoSub    - Branches, based on a condition

33. On...GoTo            - Branches, based on a condition

34. Open                    - Opens a text file
35. Option Base    - Changes the default lower limit for arrays

36. Option Compare   - Declares the default comparison mode when comparing strings

37. Erase                     - Re-initializes an array

38. Error                      - Simulates a specific error condition

39. FileCopy              - Copies a file

40. Let                      - Assigns the value of an expression to a variable or property

41. Line Input #      - Reads a line of data from a sequential text file
42. Load                       - Loads an object but doesn't show it

43. Lock...Unlock       - Controls access to a text file

44. Mid                       - Replaces characters in a string with other characters

45. Print #               - Writes data to a sequential file

46. Get                       - Reads data from a text file

47. GoSub...Return       - Branches to and returns from a procedure

48. GoTo                       - Branches to a specified statement within a procedure

49. If-Then-Else        - Processes statements conditionally (the Else part is optional)

50. Input #                - Reads data from a sequential text file

51. Kill                        - Deletes a file

52. Stop                          - Pauses the program

53. Sub                           - Declares the name and arguments of a Sub procedure

54. Time                         - Sets the system time

55. Type                         - Defines a custom data type

56. Unload                      - Removes an object from memory

57. While...Wend           - Loops through a set of instructions as long as a certain condition remains true

58. Width #                    - Sets the output line width of a text file

59. With                        - Allows a shorthand way of accessing multiple properties for an object

60. Write #                - Writes data to a sequential text file

61. Put                        - Writes a variable to a text file

62. RaiseEvent        - Fires a user-defined event

63. Randomize        - Initializes the random number generator

64. ReDim                - Changes the dimensions of an array

65. Rem                        - Specifies a line of comments (same as an apostrophe ['])

66. Reset                        - Closes all open text files

67. Resume                - Resumes execution when an error-handling routine finishes

68. RmDir                - Removes an empty directory

69. SaveSetting        - Saves or creates an application entry in the Windows Registry

70. Seek                        - Sets the position for the next access in a text file

71. Select Case        - Processes statements conditionally

72. SendKeys                - Sends keystrokes to the active window

73. Set                        - Assigns an object reference to a variable or property

74. SetAttr                - Changes attribute information for a file

75. Static                        - Declares variables at the procedure level so that the variables retain their values as long as the code is running and the project hasn't been reset.

Monday, February 16, 2015

Write a simple calculation Macro in Excel VBA

Calculate with Excel VBA and add, subtract, multiply and divide values just like you are used to doing in Excel.

Let's develop a small macro which involves a simple calculation (adding a value to a variable) and a very important programming technique.

Place a command button on your worksheet and add the following code lines:

Dim x As Integer
x = Range("A1").Value

x = x + 1
Range("A1").Value = x

1. The first code line declares a variable with name x of type Integer.

2. Next, we initialize this variable with the value of cell A1.

3. We want to add 1 to the variable x. we can do this by adding the line 'x = x +1'.
In Excel Visual Basic (and in other programming languages), the symbol '=' means becomes. It does not mean equal.
So x = x + 1 means x becomes x + 1.
In other words: take the present value of x and add 1 to it. Example: If x = 6, x becomes 6 + 1 = 7.

4. Finally, place the variable with the new value into cell A1.
Exit the Visual Basic Editor and enter a value into cell A1. Click on CommandButton1 to see how the value of cell A1 is incremented each time you click on CommandButton1.

Result:


We have just created a counter in Excel VBA.

Type of data variables used in Excel VBA ?

Excel VBA uses variables just like any other programming language. Learn how to declare and initialize an excel vba variable of type Integer, String, Double, Boolean and Date.

We will learn how to declare, initialize and display an Excel VBA variable. A variable is used to store a value. A variable can be of any type. In Excel VBA, we have variables of type Integer to store whole numbers, variables of type Double which can also store numbers after the comma, variables of type String to store text, variables of type Boolean to hold the value True or False and variables of type Date to store dates.

Place a command button on your worksheet and add the code lines described in this chapter. To execute the code lines, click the command button on the sheet.

Variable of type Integer

Integer variables are used to store whole numbers.
Code:
Dim x As Integer
x = 6
Range("A1").Value = x

Result:


1. The first code line 'Dim x As Integer' declares an Excel VBA variable with name x of type Integer. Letting Excel VBA know we are using a variable is called declaring a variable.

2. Next, we initialize the variable. In Excel VBA (and in many other programming languages), initializing simply means assigning a beginning (initial) value to a variable. This is done by adding the line 'x =6'.

3. Finally, we place the value assigned to the variable x into cell A1. This can be done by adding the line: 'Range("A1").Value = x'.


Variable type - String

String variables are used to store text.

Code:
Dim book As String
book = "History"
Range("A1").Value = book

Result:

1. The first code line 'Dim book As String' declares an Excel VBA variable with name book of type String.

2. Next, we initialize the variable. For example, add the line: book = "History". Always use apostrophes to initialize String variables.

3. Finally, we place the text assigned to the variable book into cell A1. You can achieve this by adding the line 'Range("A1").Value = book'


Variable type  - Double

A variable of type Double is more accurate than a variable of type Integer and can also store numbers after the comma.

Code:
Dim x As Integer
x = 5.5
MsgBox "value is " & x

Result:

But that is not the right value! We initialized the variable with value 5.5 and we get the value 6. What we need is a variable of type Double.

Code:
Dim x As Double
x = 5.5
MsgBox "value is " & x 

Result:

You might think, why we should use Integer variables, if you could use the more accurate Double variables. That is because Double variables, and even more accurate variables, need more space and as a result your code will run slower (as program size increases). Apart from this, you will see that errors are easier to find when you use variables of the right type.

Variable type  - Boolean

In Excel VBA, you can use Boolean variables to hold the value True or False. 

Code:
Dim continue As Boolean
continue = True

If continue = True Then 
MsgBox "Boolean variables are Great"

Result:


1. The first code line declares a variable of type Boolean.
2. Next, we initialize the Boolean variable with value True.
3. Finally, we can use the Boolean variable to only display a MsgBox if the variable holds the value True.


Variable type - Date

To declare a date, we use the Dim statement. To initialize a date, we use the DateValue function.


String Manipulation in Excel VBA: 

There are many functions in Excel VBA we can use to manipulate strings. Below are few of the most important functions.

Place a command button on your worksheet and add the code lines described in this chapter. To execute the code lines, click the command button on the sheet.


Join Strings

We use the & operator to concatenate (join) strings.

Code:
Dim text1 As String, text2 As String
text1 = "Hello "
text2 = "Ravi"

MsgBox text1 & text2 

Result:


Left

To extract the leftmost characters from a string, use Left.

Code:
Dim text As String
text = "Innovatively done"

MsgBox Left(text, 4)

Result:


Right

To extract the rightmost characters from a string, use Right. We can directly insert text in a function as well.

Code:
MsgBox Right("Innovatively done", 4)

Result:


Len

To get the length of a string, use Len.

Code:
MsgBox Len("Innovatively done")

Result:


Position 17 in above text i.e. space is included in the count!


Instr

To find the position of a substring in a string, use Instr.

Code:
MsgBox InStr("Innovatively done", "vat")

Result:
string "vat" is found at position 5 in the above sample text.


Mid

To extract a substring, starting in the middle of a string, use Mid.

Code:
MsgBox Mid("Innovatively done", 14, 4)

Result:
The text started at position 14 with length 4 in above sample text.

What is Worksheet Function in Excel VBA ?

We can access almost any Excel function through the Application object.
1. For example, place a command button on your worksheet and add the following code line:

Range("A3").Value = Application.WorksheetFunction.Average(Range("A1:A2"))

When you click the command button on the worksheet, Excel VBA calculates the average of the values in Cell A1 and Cell A2 and places the result into cell A3.


instead of
Application.WorksheetFunction.Average
we can also use
WorksheetFunction.Average

There are many more worksheet functions you can use in Excel VBA.
1. Launch the Visual Basic Editor
2. Type in: worksheetfunction
3. A list will appear showing you all the worksheet functions available


You can find many worksheet functions and make proper use on them as and when needed, while writing codes.

What are Objects, Properties and Methods in Excel VBA ?

An object has properties and methods. Excel Visual Basic is a semi-object oriented programming language. Learn more about the object hierarchy of Excel Visual Basic.

In Excel VBA, objects, properties and methods are connected with a dot. Properties are something which an object has (they describe the object), while methods do something (they perform an action with an object).


What is Excel VBA Property ?

Let's take a look at an Excel VBA object and an Excel VBA property. We will use the Range object and the Formula property. The Range object is nothing more than a cell (or cells) on your worksheet. 

We already know from Excel that a cell can contain a formula.

1. Place the value 10 into cell A1.
2. Create a command button.
3. Add the line:
Range("B1").Formula = Range("A1") * 2
4. Execute the macro. This macro places the formula into cell B1 and the result will be calculated (20).


What is Excel VBA Method ?

We will use the Range object again and the ClearContents method.
1. Place the value 10 into cell A1.
2. Create a command button.
3. Add the line:
Range("A1").ClearContents
4. Execute the macro. Cell A1 is now empty!


How to see all the properties and methods of an object ?

The Range object has many more properties and methods. Want to see more?
1. Launch the Visual Basic Editor.
2. Type in: Range.
3. A list will appear showing you all the Excel VBA methods and properties of the Range object. The fingers are the properties and the green boxes are the methods of the Range object.


Workbook and Worksheet:
The Worksheet and Workbook object have properties and methods as well, such as the count property which counts the number of active workbooks or worksheets. The Workbook and Worksheet object are commonly used in Excel VBA. They are very useful when your macro code has to be executed on different workbooks or worksheets.


What is Object Hierarchy ?

Now that we have seen the Range object, we can understand the Workbook and Worksheet object better. In Excel Visual Basic each object can contain another object, and that object can contain another object, etc. In other words, Excel VBA programming involves working with an object hierarchy.

The main hierarchy of all objects is Excel itself. We call it the Application object. The application object contains other objects. An example of an object of the Application object is the Workbook object (Excel File). This can be any workbook you have created. The Workbook object contains other objects, such as the Worksheet object. The Worksheet object contains other objects, such as the Range object.

We have used the following code line a lot:
Range("A1").Value

but what we really meant was cell A1 on the first worksheet of Book1. Thus we should actually add the following line in Excel VBA:
Application.Workbooks("Book1").Worksheets(1).Range("A1").Value

Fortunately we do not have to add a code line this way. This is because Excel Visual Basic knew we meant Book1 and the first worksheet because we placed our command button there (remember?). Now also remember the automatically created module when we recorded a macro with the Excel Macro Recorder. Code placed into a module is available to all workbooks and worksheets.

Place the Sub test into a module (In the Visual Basic Editor, click on Insert and then Module).

Sub test()

Range("A1").Value = "code placed here"

End Sub

1. Execute the code (Click on Macros and then Run, or click on Run from the Visual Basic Editor). The words "code placed here" will be placed into cell A1.
2. Now go to the second worksheet. Execute the code again. You will see that the words will be placed on the second worksheet as well!
3. Now even open a new workbook and execute the macro again. You will see that the words will be placed there as well! That is because we didn't specify a workbook or worksheet name and Excel VBA automatically takes the active workbook and active worksheet. Be aware that if you want to change different things on different sheets to include the Worksheet object.

Below are few Properties and methods of the Workbook and Worksheet object :

You may have noticed that worksheets and workbooks are both plural (see the complete code line mentioned earlier). That's because they are actually collections. The Workbooks collection contains all the Workbook objects that are currently open. The Worksheets collection contains all the Worksheet objects in a workbook.

You can refer to a member of the collection, that is: a single workbook or single worksheet, in two ways. Using the index number, Worksheets(1) is the first worksheet starting from the left. Using the member's name: Worksheets("sheet1").

Below are few examples.
1. The Count property of the Worksheets collection and Workbooks collection. The following code line counts the number of worksheets of a workbook. Place a command button on your worksheet and add the code line:

MsgBox Worksheets.Count

Result when you click the command button on the sheet:


You can also use the Count property to count the number of active workbooks.
2. The Add method of the Workbooks collection and Worksheets collection. The following code line creates a new worksheet.
Worksheets.Add

You can also use the Add method to add a new workbook.
3. The Worksheet object contains more interesting collections, such as the Rows collection. In Excel VBA you can use the Select method to select a row. The code line below selects row 2.
Worksheets(1).Rows(2).Select

In a similar way, you can select a column. The code line below selects column 7.
Worksheets(1).Columns(7).Select


What is Application Object ?

The mother of all objects is Excel itself. We call it the Application object. The application object gives access to a lot of Excel related options.

The mother of all objects is Excel itself. We call it the Application object. The application object gives access to a lot of Excel related options.

How to use comments in the Excel VBA Macro ?

Adding macro comments to the Excel VBA code will make it easy to read the complex programs, which have long codes.

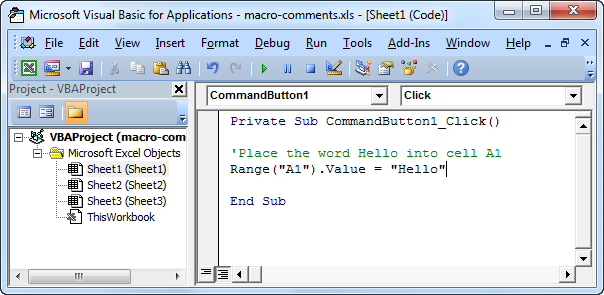
The macro comment is an text line created in a macro which will not be executed by the Excel VBA. It is only there to provide you information about the macro. To let Excel VBA know that it is a comment, place an apostrophe at the start of the text. Execute the following steps to place a comment.

1. Launch the Visual Basic Editor.
2. Insert the line: 'Place the word Hello into cell A1' before the code line. After the line is inserted, Excel VBA colors the line green to indicate that it is a comment.


Macro comments become more useful as our program size increases, and we need to remember the information and recall when needed with the help of comments.

How to use Visual Basic Editor in Excel VBA ?

The Visual Basic Editor is the starting point for creating macros in Excel VBA, so it is important to get this configuration right. To launch the Visual Basic Editor in Excel 2010 or Excel 2007, click on Visual Basic (or press Alt+F11).


Below Visual Basic Editor window will open


The left window with the sheet names in it is called the Project Explorer. If you can't see the Project Explorer, click on View and then Project Explorer. Most probably the Project Explorer will already appear as a column on the left side of the screen. If not, follow the below steps to achieve this:

1. Right click on the Project Explorer
2. Check Dockable (If required)
3. Click on Project - VBAProject and drag the Project Explorer to the left side of the screen

The Code window can be added by clicking on one of the sheet names. To cover the whole screen, you can maximize the Code Window. We feel that this is the best configuration of the Visual Basic Editor.

On the left side of the window under project explorer, you will find 3 folders:
1. Microsoft Excel Objects:
All Excel Sheets and workbooks will be available under this folder
2. Forms:
Any user forms created in the excl VBA will be available under this folder
3. Module:
All created macros will be available under this modules folder

You can add the object or reference libraries with the help of adding VBA references.
1. Go to Tools
2. Click on References
3. Tick the library or references you need to add to execute your macros

4. Click OK, done


Sunday, February 15, 2015

Macro Security in Excel VBA

You need to set up the macro security settings correctly to protect yourself against potential viruses. Make sure your macro security settings are set up correctly so that they may not create any harm to your computer.

To set up the macro security settings in Excel 2010 or Excel 2007, execute the following steps.


1. Click on Macro Security.


2. Here you have four options. The first option will disable all macros. The second option will always ask you to enable a macro. The third option will only allow macros with a digital signature to run, and ask you to enable others. The fourth option will enable all macros.


As per me we should use the second security level if we are downloading a lot of Excel files from the internet. With this security level we can always disable the macro if we don't trust the owner of the Excel file.

We can use the fourth security level only if we are only typing our own macros and checking them. With this security level we don't have to always enable macros.


How to edit and debug the macro created in Excel VBA ?

There are two ways to view the already recorded macro.

1. You can click on Macros from the Developer tab and then click on Edit. The Visual Basic Editor will appear.
2. You can directly open the Visual Basic Editor by clicking on Visual Basic from the Developer tab (or press Alt+F11).


The created macros are placed into a module called Module1. You can also place the code on the any of the Sheets, in this case the macro will be available for particular sheet only. While the macro created in the module is available for all the sheets in the workbook.

To manually run the code step by step, press F8

To run the code till particular step, you need to break the code for this, put your cursor on the line where you need to put break and press F9


Once you press F9, the line color will be changed to brown selection. When executed the macro will stop at this line.


How to use Excel Macro Recorder ?

The Excel Macro Recorder is a very useful tool included in Excel VBA. With the Excel Macro Recorder you can record a task you perform with Excel. Next, you can execute the task over and over with the click of a button which can save you a lot of time.

The Macro Recorder, a very useful tool included in Excel VBA, records every task you perform with Excel. This is good news if you want to automate repetitive tasks. All you have to do is record a specific task once. Next, you can execute the task over and over with the click of a button. This can save you a lot of time! The Macro Recorder is also a great help when you don't know how to program a specific task in Excel VBA. Simply open the Visual Basic Editor after recording the task to see how it can be programmed.

There are a lot of things you cannot do with the Excel Macro Recorder. For example, we cannot loop through a range of data with the Macro Recorder. Also, the Macro Recorder uses a lot more code than actually required, which can slow your execution process.

To record, run and edit a recorded macro, follow the below steps:
1. Click on the Developer tab


2. Click on Record Macro. See the picture below. Each of the commands you perform will be saved into the macro.


3. Here you can give your macro a name and you can enter a shortcut for your macro (both optional). You can store your macro in three workbooks. If you choose to store your macro in Personal Macro Workbook, the macro will be available to all your workbooks (Excel Files). This is because Excel stores your macro in a hidden workbook that opens automatically when Excel starts. If you choose to store your macro in New Workbook, the macro will only be available in an automatically new opened workbook. If you choose to store your macro in This Workbook, the macro will only be available in the current workbook.


We will now record a macro that changes the format of Cells to Number with zero decimals.

4. Click on OK.
5. Right mouse click on the active cell (selected cell). Be sure not to select any other cell! Then click on Format Cells...


6. Choose Number and click on OK.


Below is the before and after formatting result:


How to create a command button and assign macro to it in Excel VBA ?

You can now click on the Developer tab which is now visible next to the View tab.
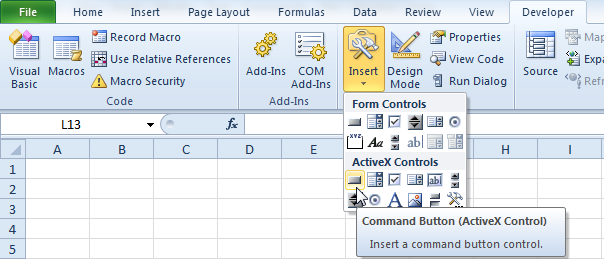
1. Click on Insert
2. Click on Command Button in the ActiveX Controls section


Create and assign the macro to our created button
We will write few lines of code and assign them to the command button.

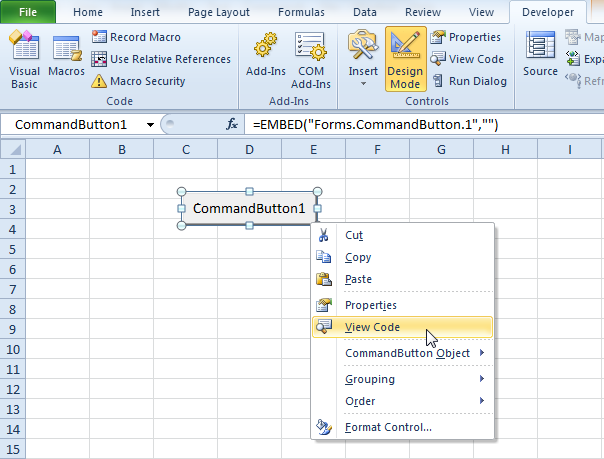
1. Right click on the CommandButton1
2. Click on View Code


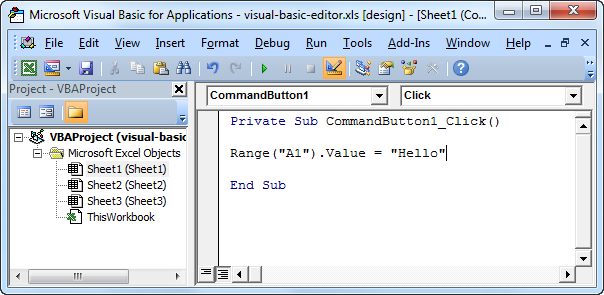
3. The Visual Basic Editor will be opened. Place you cursor between 'Private Sub CommandButton1_Click()' and 'End Sub'.
4. For example, add the following code line:

Range("A1").Value = "My First Code !"


We have completed creating the simple macro and assigning it to command button.

How to turn on the Developer Tab in Excel ?

1. Click on the File tab and choose Options. This will open the Excel Options dialog box
2. Click Customize Ribbon on the left side of the dialog box
3. Under Choose commands from on the left side of the dialog box, select Popular Commands
4. Under Customize the ribbon on the right side of the dialog box, select Main tabs
5. Check the Developer check box and click OK


6. Done, you will be able to see the below developer tab activate in Excel Menu